スケジュール登録処理を作成(CakePHP修行 #8)
Fri, Jul 18, 2008今回はスケジュール登録画面を作成します。
今回は(1)スケジュール登録ページのリンク→(2)登録ページ→(3)登録処理→(4)登録完了メッセージの表示、と
順を追って説明していきます。
ちなみに完成画像はこちら↓
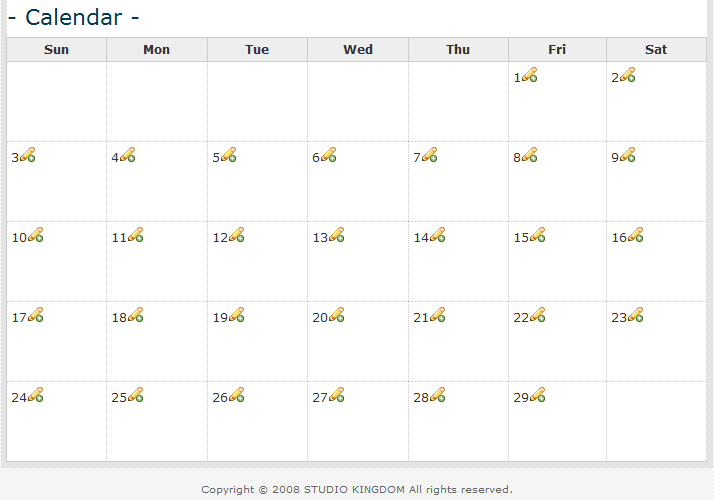
(1)スケジュール登録ページのリンク
・app/view/schelue/calendar.thtml
※前回まで、app/view/schelue/index.thtmlだったファイルをcalendar.thtmlに変更しました。
まずは、カレンダーページの日付セル内にそれぞれ日付登録ページへのリンクを張ります。
ここでリンク画像にfamfamfamさんの画像を使用します。
画像形式がPNGなので、IE6対策を施しておきます。
IE6のPNG画像透過処理を行ってくれるto-Rさんが作成された便利なjsライブラリがあるので、
それを利用させていただきます。ダウンロードしたjsファイルをapp/webroot/jsフォルダに入れてください。
リンクをこんな風に記述。
echo $html->link($html->image("pencil_add.png" , array("class"=>"alphafilter")), '/schedules/add/' . $month->year . "/" . $month->month . "/" . $Day->thisDay(),null,null,false);
また、ダウンロードしたjsファイルを読み込むために、レイアウトのデフォルトファイルにjsファイル読み込みの記述を追加します。
後述するjqueryファイルも同じように追記します。
・app/views/layouts/default.thtml
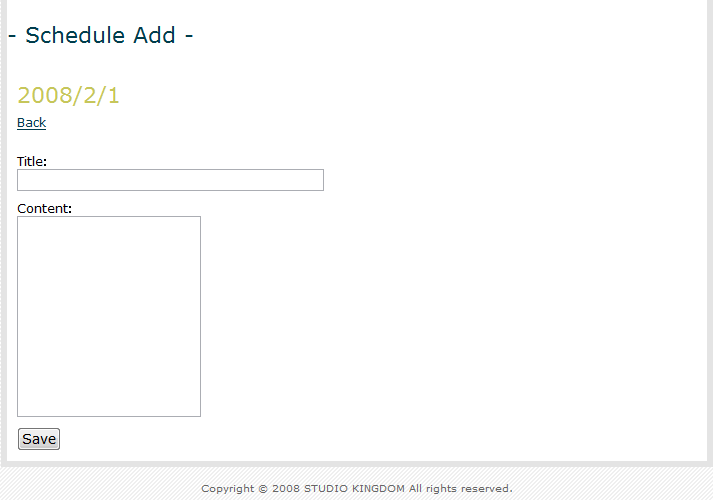
(2)登録ページ
・app/view/schedule/add.thtml
app/view/schedlue配下にadd.thtmlを作成します。
このファイルはCakePHPの典型的な、登録フォームのページにします。
  - Schedule Add -


    < ?php echo($year . "/" . $month . "/" . $day) ?>

  < ?php echo($html->link("Back", '/schedules/calendar/' . $year .'/' . $month)) ?>
(3)登録処理
・app/controllers/schedules_controller.php
登録処理もCakePHPの典型的な登録処理です。
登録完了メッセージをセッションに入れているのは百式さんの手法をパクらせていただきました。
//add
function add($year = null, $month = null, $day = null)
{
    $this->set("year",$year);
    $this->set("month",$month);
    $this->set("day",$day);

    if(!empty($this->data))
    {
        //日付をセット
        $this->data['Schedule']['start'] =
            $this->data['Schedule']['start_year'] . "-" .
            $this->data['Schedule']['start_month'] . "-" .
            $this->data['Schedule']['start_day'];

        //データ保存
        if($this->Schedule->save($this->data))
        {
            $this->Session->write('sys_msg', 'Your schedule has been saved.');
            $this->redirect('/schedules/calendar/' . $year . "/" . $month);
        }
    }
}
(4)登録完了メッセージの表示
・app/view/schelue/calendar.thtml
登録完了メッセージをjqeryを使用して、ふわーんと表示させています。これも百式さんの手法をパクらせていただきました。
< ?php if(isset($sys_msg)){ ?>


  < ?php echo($sys_msg); ?>


< ?php } ?>